
Microk8s Control Plane API Load Balancing
Here’s a tale of how I came to load balance the Control Plane API of my 3 node microk8s cluster running on VM’s in my home lab.
- How?
- Why?
- Other ideas I probably should have thought of
- Other things I tried that didn’t work
How?
Before we get started, here’s some of my choices, limitations and requirements:
Requirements
This is to make connecting to my cluster more reliable when a node is unavailable. Could be it’s dead, could be it’s in maintenance. Whatever.
I don’t want to change my ~/.kube/config after this.
Stuff
I have a pfSense firewall. I’ll use that with HAProxy to provide Load Balancing.
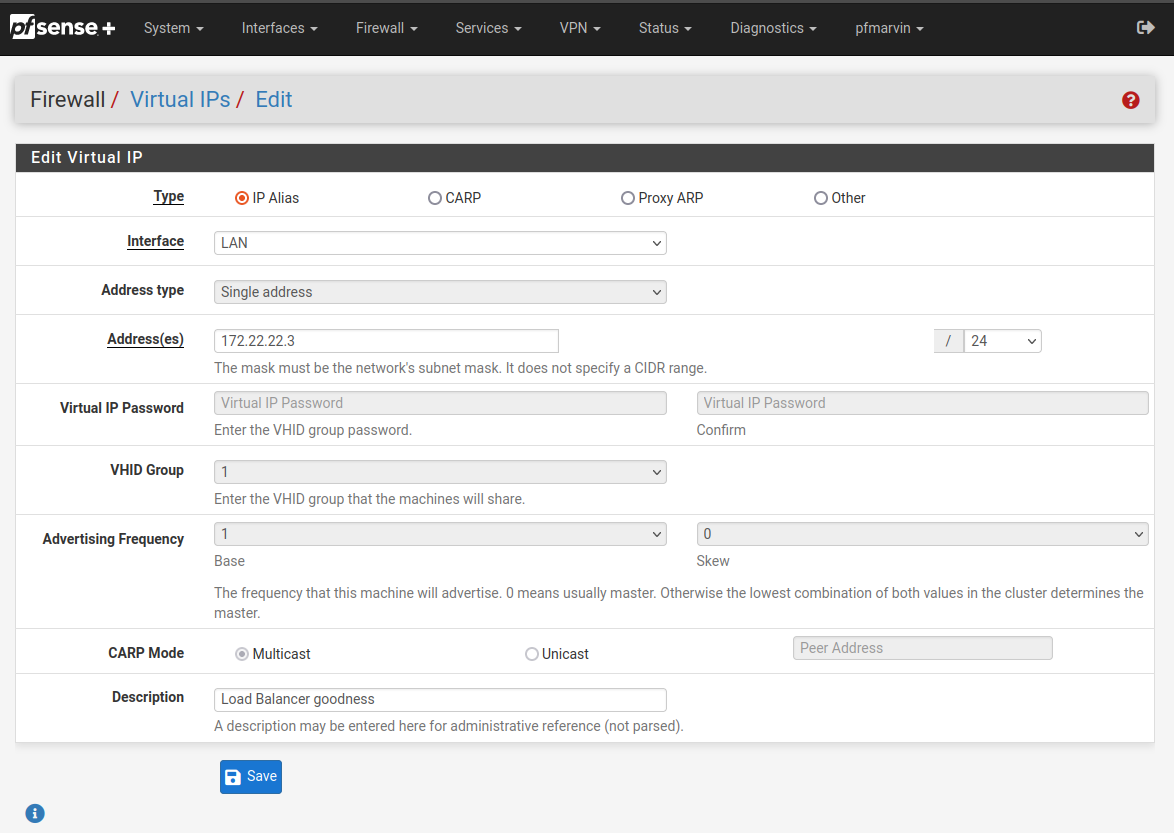
Load Balancer IP: 172.22.22.3
Update your microk8s certs
kubectl does a check of the TLS cert to make sure it’s valid (good kubectl).
One of these checks is a CommonName and SAN (Subject Alternate Name) check.
In the SAN config, there is a hostname and an IP address listed.
We need to list the new Load Balancer IP address in the IP SAN list. Without this, the certificate is invalid when you try to connect to your Load Balancer IP address.
We’ll need to update the certificates on each of microk8s nodes, as this is a per-node thing.
Where the certs live
On each microk8s node, the certs live in /var/snap/microk8s/certs/.
Let’s go there:
cd /var/snap/microk8s/certs/
We need to update server.crt and full-proxy-client.crt to add the Load Balancer IP address to make the cert valid.
Realistically, it’s probably only the server.crt, but it can’t hurt to do both.
To do this, we only need to update the csr.conf.template file, as this is used to generate and refresh the certificates.
Add the following line to the [ alt_names ] section, just above the #MOREIPS line:
IP.3 = 172.22.22.3
Where IP.3 is the next number in your list. 3 happens to be mine.
And 172.22.22.3 is my Load Balancer IP address.
Change both of these to fit your config.
EG:
[ alt_names ]
DNS.1 = kubernetes
DNS.2 = kubernetes.default
DNS.3 = kubernetes.default.svc
DNS.4 = kubernetes.default.svc.cluster
DNS.5 = kubernetes.default.svc.cluster.local
IP.1 = 127.0.0.1
IP.2 = 10.152.183.1
IP.3 = 172.22.22.3
#MOREIPS
Now refresh your certs:
# microk8s.refresh-certs --cert server.crt
# microk8s.refresh-certs --cert front-proxy-client.crt
I don’t know how permanent this change is. It may get reverted by a snap refresh or other update.
Time will tell.
I was considering ansbile-ing this, so I can replay it quick and easy if/when it does get reverted/changed.
Verify your newly updated certs
# openssl x509 -text -noout -in server.crt
# openssl x509 -text -noout -in front-proxy-client.crt
You should get a lot of information about your cert, fingerprints, key info, serial number, issuer, validity dates.
EG:
Certificate:
    Data:
        Version: 3 (0x2)
        Serial Number:
            23:75:b6:4b:e6:f4:c0:1d:74:77:98:e6:c5:cb:f3:5a:67:7d:92:12
        Signature Algorithm: sha256WithRSAEncryption
        Issuer: CN = front-proxy-ca
        Validity
            Not Before: Jun  8 12:30:01 2024 GMT
            Not After : Jun  8 12:30:01 2025 GMT
        Subject: CN = front-proxy-client
        Subject Public Key Info:
            Public Key Algorithm: rsaEncryption
                RSA Public-Key: (2048 bit)
                Modulus:
                    00:d8:d8:4f:0d:15:0e:df:91:93:a2:ea:10:d1:8f:
                    44:88:57:94:10:0a:c8:b5:9f:eb:a5:b4:d0:08:f7:
                    8d:86:a8:40:be:60:57:04:18:eb:c4:cc:7e:c4:07:
                    d5:ad:0d:fc:e3:22:56:6c:12:e9:1f:ac:ce:f2:e0:
                    27:a8:c0:58:7d:41:62:c4:ec:d6:9c:80:f4:f5:d5:
                    22:3f:a4:23:e7:57:c3:b2:ac:18:41:e7:e0:ad:0f:
                    57:1d:63:e6:55:33:44:e3:24:78:44:d4:c5:62:62:
                    cb:ad:77:0c:95:53:30:06:8c:12:d4:7e:d4:83:f3:
                    68:21:73:14:79:46:45:cd:cf:4f:02:73:09:23:55:
                    e2:9d:8d:cf:9d:89:25:3b:c8:43:bc:3d:04:60:c5:
                    e9:0c:0f:cb:b1:e5:86:b9:37:97:56:13:38:75:b7:
                    eb:60:d7:45:5b:63:49:f1:a9:5c:b7:33:c5:2a:2a:
                    af:4e:69:05:3a:03:9a:07:5b:76:cf:c7:56:a2:ba:
                    b1:b9:18:98:6f:d9:91:35:60:ee:80:af:0d:29:46:
                    68:2b:9b:dc:a4:e3:e5:84:d8:0b:d0:5b:77:60:c0:
                    69:cb:31:73:97:c4:f2:de:ac:d3:d9:b1:24:46:c5:
                    40:55:79:3d:ba:f5:ee:04:29:19:53:e6:f6:3f:81:
                    cf:03
                Exponent: 65537 (0x10001)
        X509v3 extensions:
            X509v3 Authority Key Identifier:
                keyid:1E:D2:0C:FE:5F:F2:7F:91:87:8B:4C:A3:4D:DF:97:CF:BE:E4:13:CA
                DirName:/CN=front-proxy-ca
                serial:05:B2:BD:79:5A:87:6D:96:C5:54:BB:F2:65:A8:99:2C:9B:C3:D2:B6

            X509v3 Basic Constraints:
                CA:FALSE
            X509v3 Key Usage:
                Digital Signature, Key Encipherment, Data Encipherment
            X509v3 Extended Key Usage:
                TLS Web Server Authentication, TLS Web Client Authentication
            X509v3 Subject Alternative Name:
                DNS:kubernetes, DNS:kubernetes.default, DNS:kubernetes.default.svc, DNS:kubernetes.default.svc.cluster, DNS:kubernetes.default.svc.cluster.local, IP Address:127.0.0.1, IP Address:10.152.183.1, IP Address:172.22.22.3, IP Address:172.22.22.9
    Signature Algorithm: sha256WithRSAEncryption
         55:91:e9:ac:c8:25:ea:bc:64:67:d0:bb:8b:d7:3d:8a:95:9b:
         3c:bf:ef:5e:e6:12:49:a7:c4:5b:08:b2:9e:94:e8:dc:fe:43:
         eb:d3:4e:d4:d5:20:6c:3c:08:bf:87:bc:c3:e1:72:4a:81:28:
         40:2b:ba:a5:3e:65:7e:bc:f6:90:e3:bb:b7:93:c2:5f:57:95:
         98:e0:3e:0c:cd:0c:f1:4d:a3:ae:3f:34:18:06:b9:49:82:1d:
         89:25:68:1c:f6:4f:e4:0d:39:5c:7b:1b:e0:40:0c:43:44:76:
         65:92:30:ac:8c:1e:cb:8d:53:2e:eb:79:ec:b1:7e:52:e3:88:
         69:36:fd:97:1c:65:e1:f0:08:87:a2:a8:c1:3d:80:29:bc:06:
         62:ff:ed:f8:2e:ef:69:d1:ce:80:6c:1a:fd:24:04:cb:18:eb:
         b1:c5:90:59:cd:7c:a9:fb:61:a5:8d:3b:89:b9:1b:2f:f1:73:
         f8:77:46:89:ad:65:a1:00:7a:ca:1c:81:f5:70:5b:1c:59:07:
         ee:ef:46:2f:e1:67:3f:f6:fa:11:33:aa:34:69:6d:0d:3d:4c:
         3e:74:e2:8c:a3:80:0f:b8:78:02:be:57:c1:ad:12:c3:38:ac:
         67:24:28:76:7c:b3:f2:f5:4a:6d:8f:48:a7:30:47:7c:68:22:
         96:4f:1b:75
But most importantly in this case, the X509v3 Subject Alternative Name: should be updated to include your Load Balancer IP address.
EG:
X509v3 Subject Alternative Name:
    DNS:kubernetes, DNS:kubernetes.default, DNS:kubernetes.default.svc, DNS:kubernetes.default.svc.cluster, DNS:kubernetes.default.svc.cluster.local, IP Address:127.0.0.1, IP Address:10.152.183.1, IP Address:172.22.22.3, IP Address:172.22.22.9
Import this updated cert and CA to pfSense

I added both the certificate and the key to my microk8s CA (Certificate Authority) to pfSense. You don’t have to add the key, but I did. I’ve removed the key from the screenshot for obvious reasons.
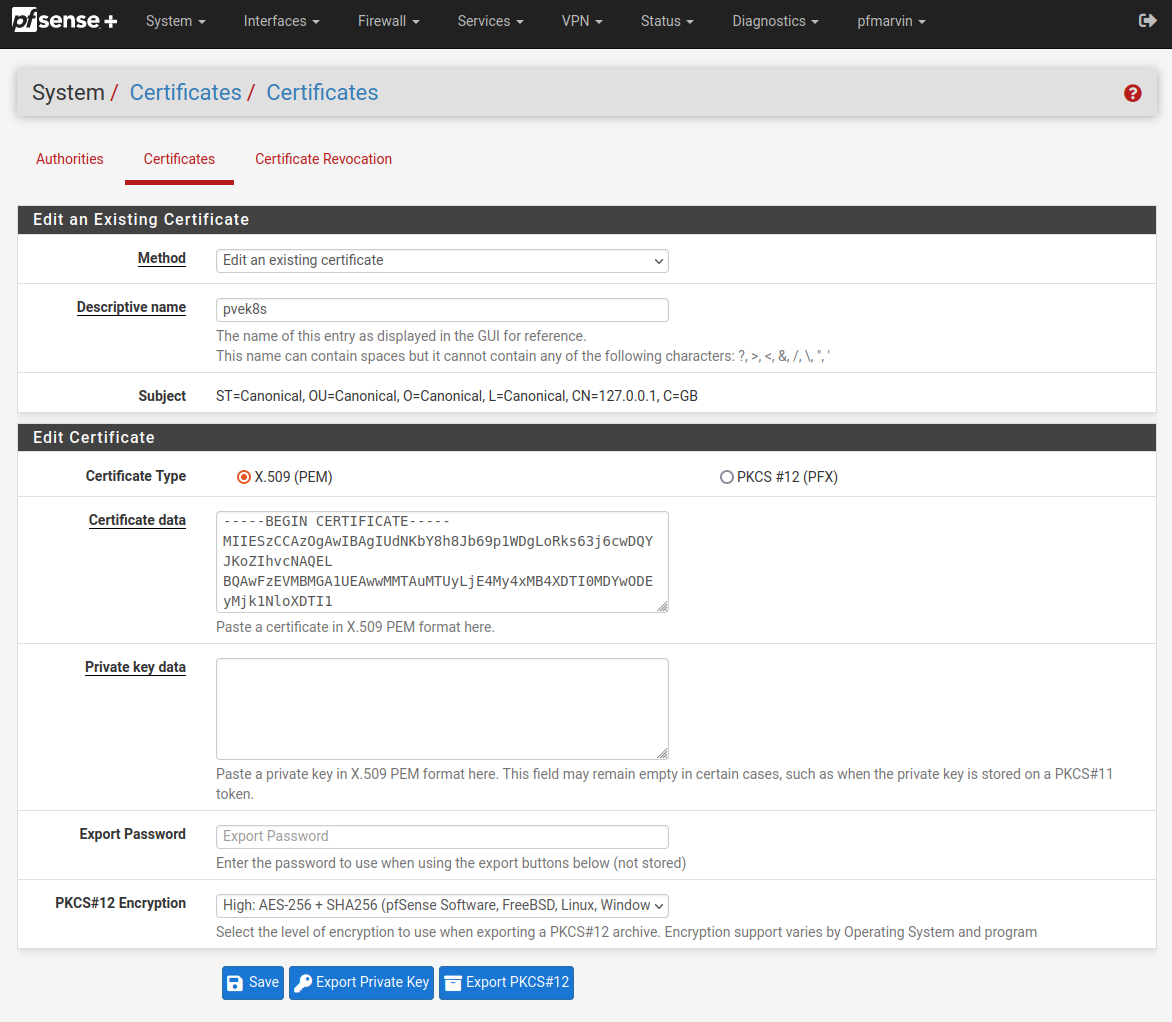
I added both the certificate and the key to my microk8s certificate to pfSense. You don’t have to add the key, but I did. I’ve removed the key from the screenshot for obvious reasons.
Setup your Load Balancer
I’m using pfSense, so the HAProxy package is the perfect choice, here.
Use a dedicated IP address
Using my choice of Load Balancer IP address, I created a Virtual IPs entry in the pfSense Firewall section.
EG:
Setup HAProxy
There’s 2 parts to this HAProxy config. Well, pretty much any Load Balancer setup, really.
- frontend
- backend
Create the HAProxy backend config
Here’s a run down of the backend config. It’s mostly straight forward.
- Add your backend nodes
- Ensure you check their certificates (it IS nice to do afterall)
- Select your CA you want to use
- DO NOT select Client Certificate. You’ll have a bad day
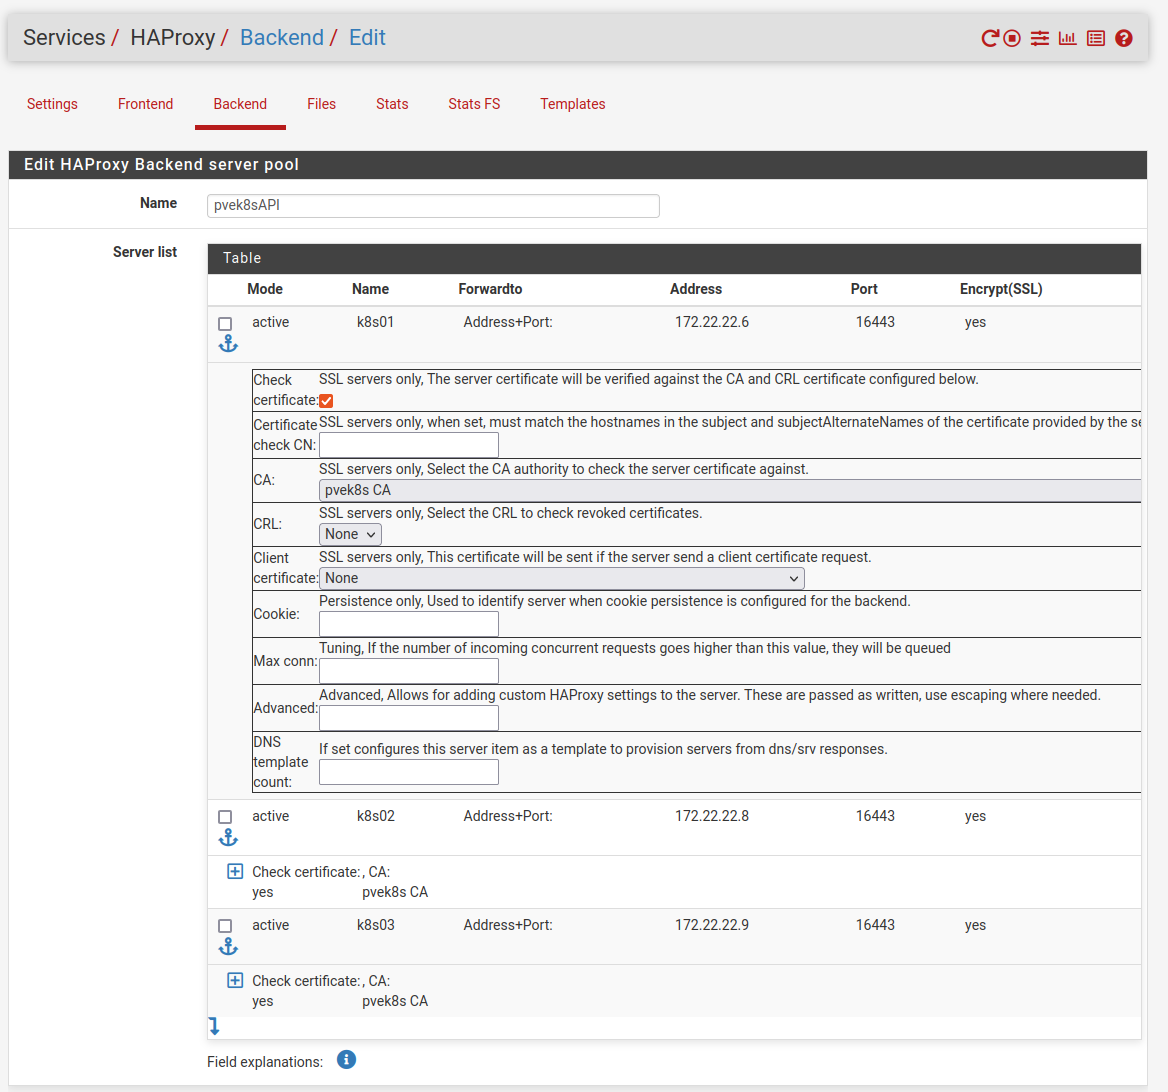
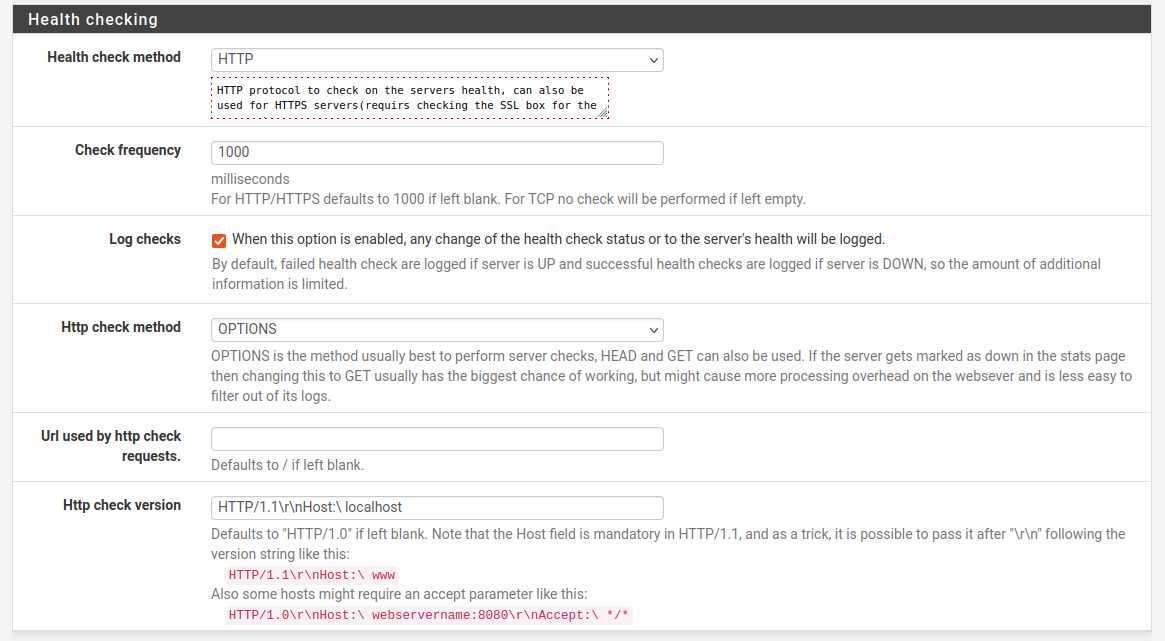
- Setup some health checks
- HTTP seemed like a good idea
- Logging felt good, too. Mostly so I could see why it broke as I was testing. You could probably turn this off.
- Tweak some advanced bits
- Because you’re going to get 403’s from the backend server, you’d best say that’s a good thing.
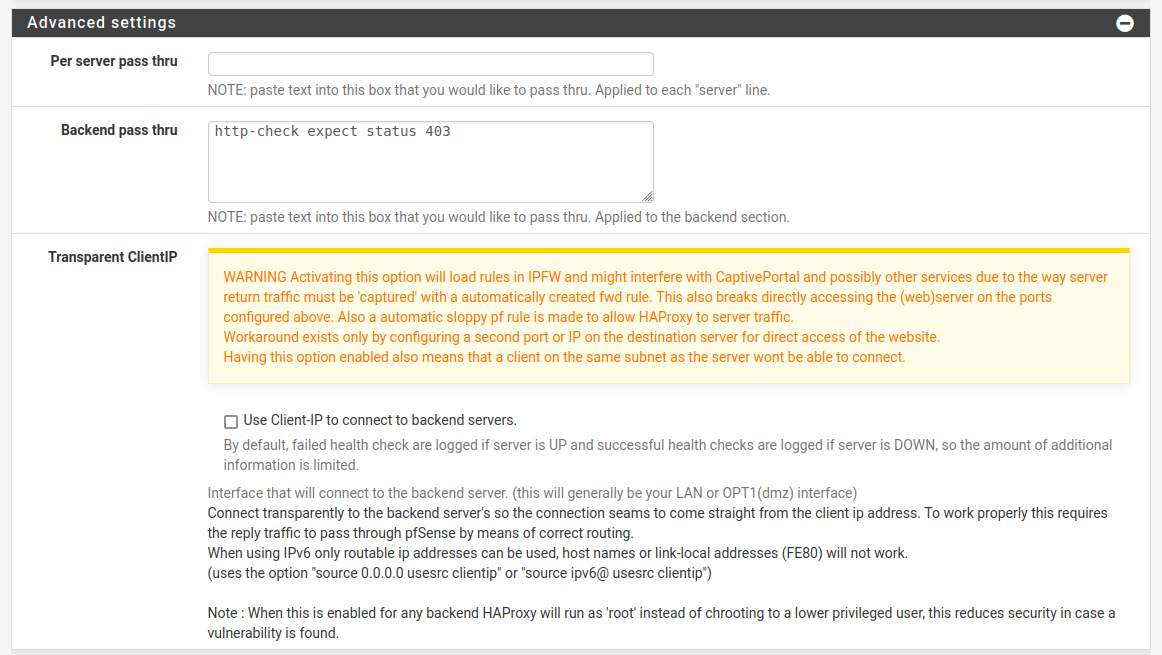
Please remember to enable stats, too. That’s much nicer to understand what’s going on and why your backend servers might be borked. Or don’t. Whatever. I’m not your mother.
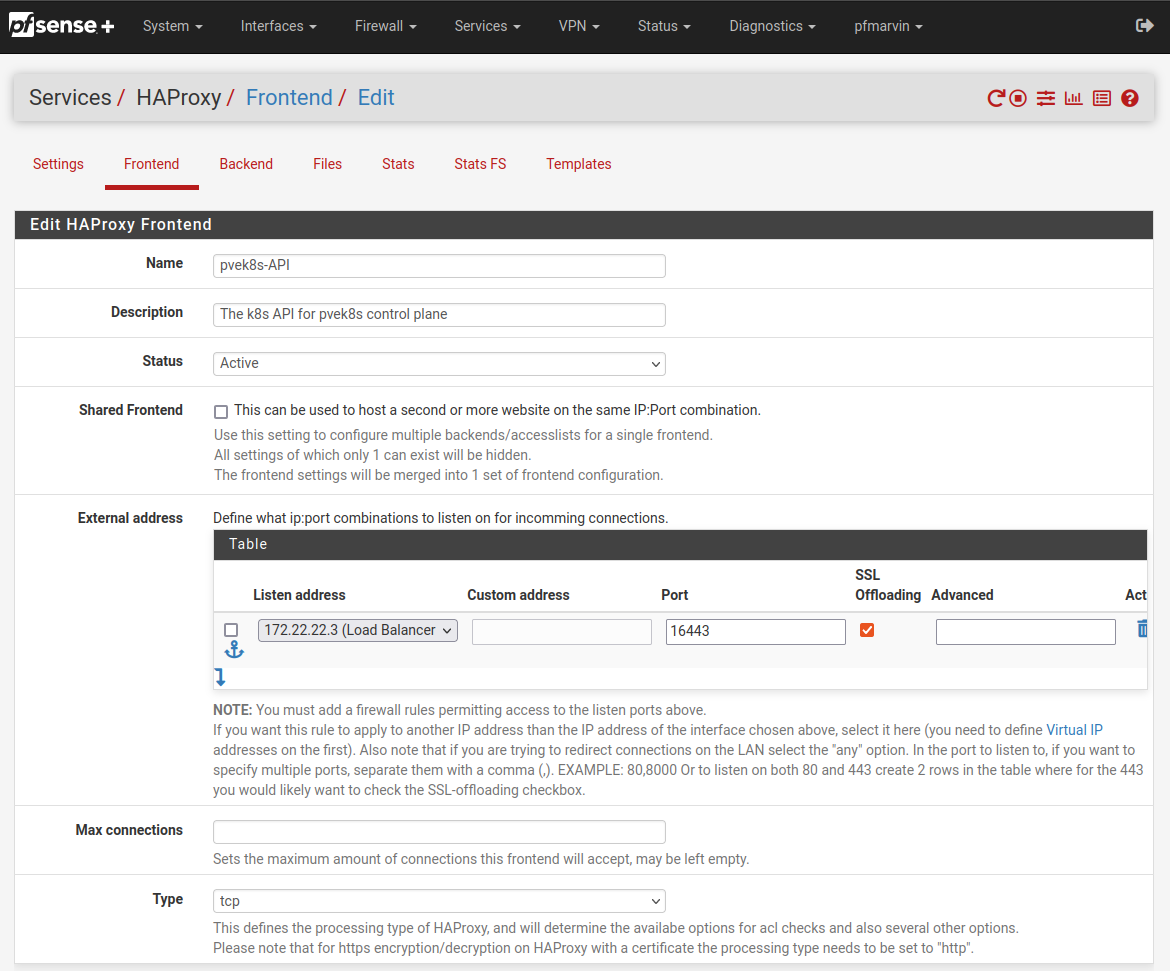
Create the HAProxy frontend config
Getting the frontend config right is where I lost the bulk of my time.
Pretty straight forward so far, make sure you’re using your chosen Load Balancer IP address and network CIDR range.
It’ll need to be an Active status. Otherwise it just won’t go.
SSL Offboarding is important here. This is what allows you set the certificate and CA to use below.
type is tcp or ssl / https (TCP). Using http/https(offloading) breaks it :shrug:
I started with tcp but ended up moving to ssl / https (TCP). It just “felt” better.
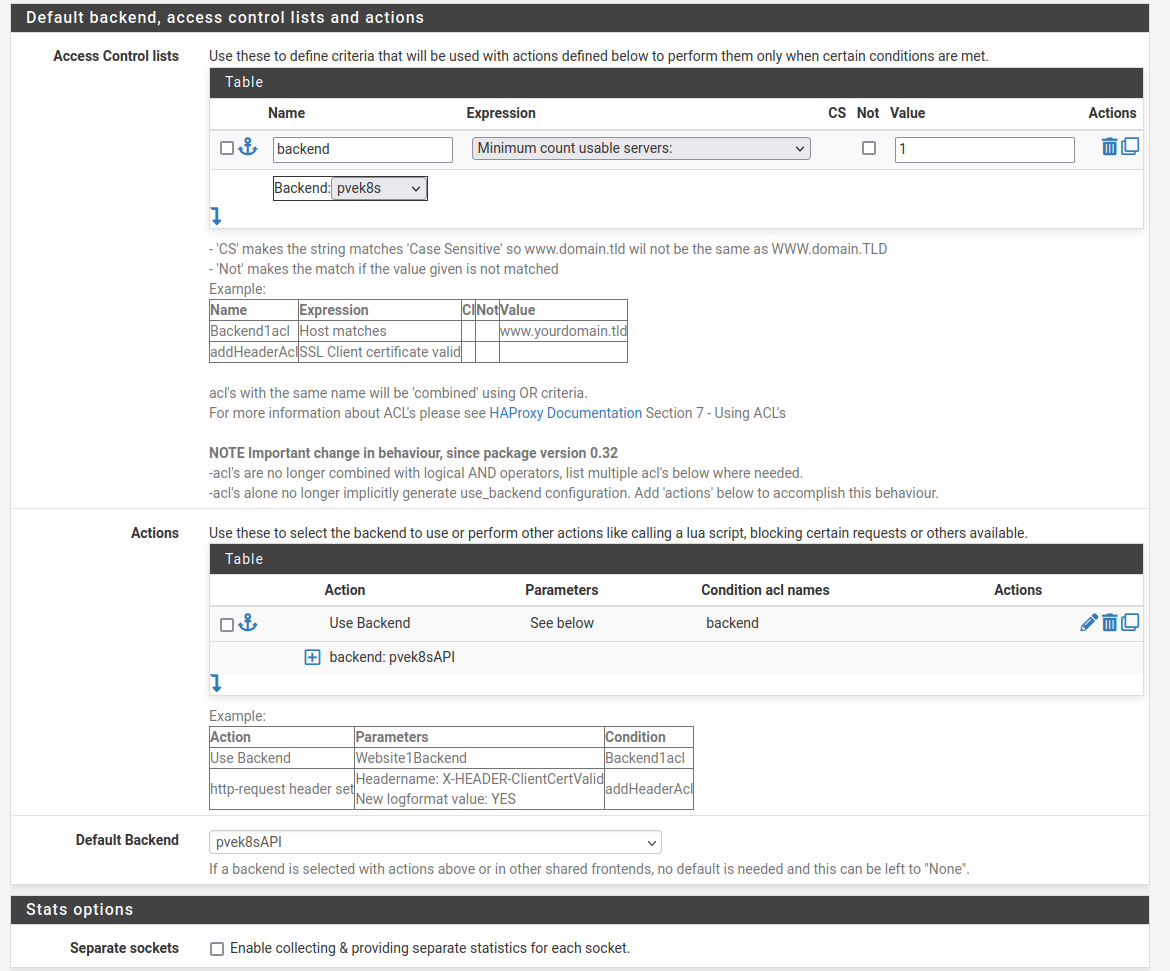
Setup an ACL to select the backend group. I just did a dodgy one. You should probably do something better. I’ve only got the one backend group here, so I’m not worried.
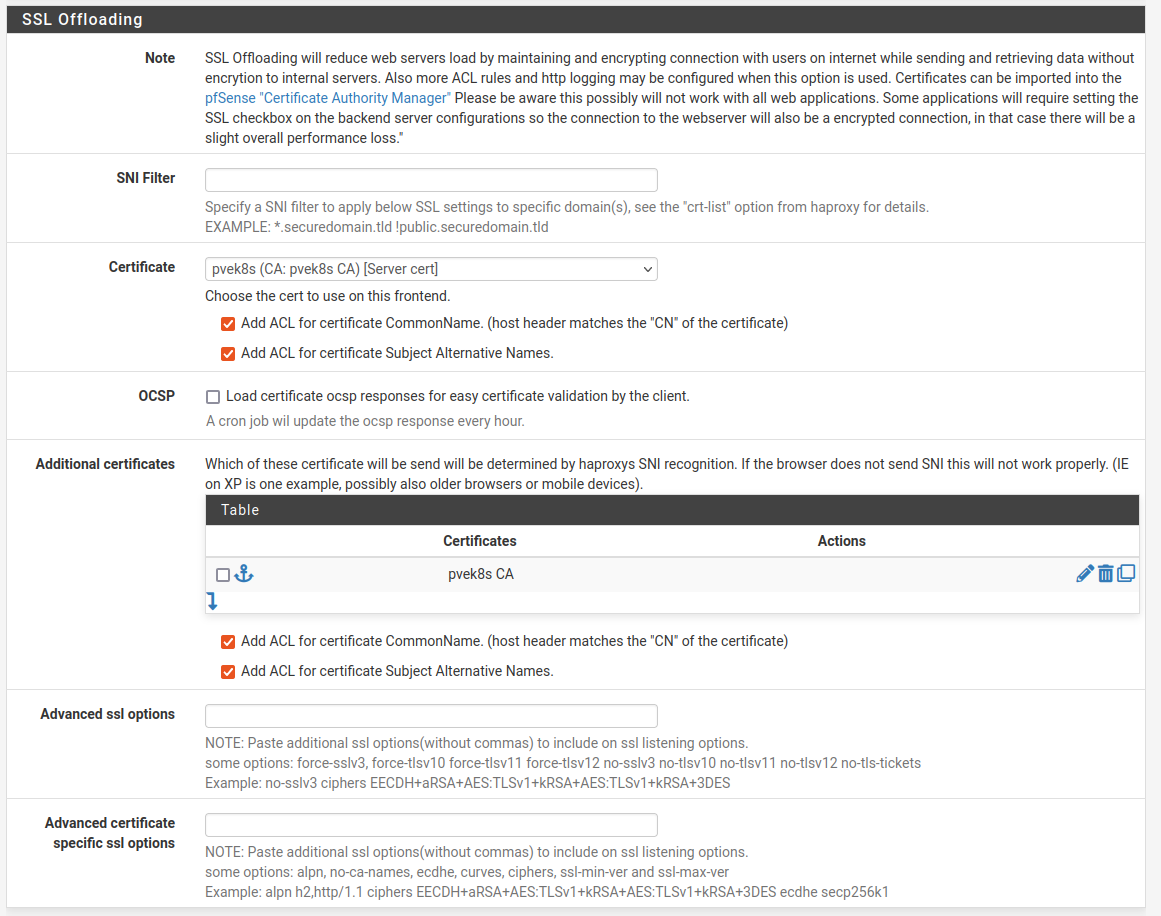
SSL Offboarding config
I left the SNI Filter blank, you could probably put something there. I didn’t.
Select your microk8s Certificate. Check the Add ACL checkboxes for CommonName and SAN’s
Update your kubectl config
The one in ~/.kube/config
Find the correct cluster config and update the server entry:
- cluster:
    certificate-authorty-data: <snipped>
    server: https://172.22.22.3:16433
  name: pvek8s-cluster
That should be about it.
Test it
Start with curl
$ curl -Iv http://172.22.22.3:16443
*   Trying 172.22.22.3:16443...
* Connected to 172.22.22.3 (172.22.22.3) port 16443
> HEAD / HTTP/1.1
> Host: 172.22.22.3:16443
> User-Agent: curl/8.5.0
> Accept: */*
>
* Empty reply from server
* Closing connection
curl: (52) Empty reply from server
Hmmm .. that’s not bad, I was expecting a 403, but that’s not bad either. It accepted the cert - that’s important bit here.
Go TLS deep
Fine, let’s see what openssl has to say about the cert
$ openssl s_client -showcerts -connect 172.22.22.3:16443
CONNECTED(00000003)
Can't use SSL_get_servername
depth=0 C = GB, ST = Canonical, L = Canonical, O = Canonical, OU = Canonical, CN = 127.0.0.1
verify error:num=20:unable to get local issuer certificate
verify return:1
depth=0 C = GB, ST = Canonical, L = Canonical, O = Canonical, OU = Canonical, CN = 127.0.0.1
verify error:num=21:unable to verify the first certificate
verify return:1
depth=0 C = GB, ST = Canonical, L = Canonical, O = Canonical, OU = Canonical, CN = 127.0.0.1
verify return:1
---
Certificate chain
 0 s:C = GB, ST = Canonical, L = Canonical, O = Canonical, OU = Canonical, CN = 127.0.0.1
   i:CN = 10.152.183.1
   a:PKEY: rsaEncryption, 2048 (bit); sigalg: RSA-SHA256
   v:NotBefore: Jun  8 12:29:56 2024 GMT; NotAfter: Jun  8 12:29:56 2025 GMT
-----BEGIN CERTIFICATE-----
MIIESzCCAzOgAwIBAgIUdNKbY8h8Jb69p1WDgLoRks63j6cwDQYJKoZIhvcNAQEL
BQAwFzEVMBMGA1UEAwwMMTAuMTUyLjE4My4xMB4XDTI0MDYwODEyMjk1NloXDTI1
MDYwODEyMjk1NlowcTELMAkGA1UEBhMCR0IxEjAQBgNVBAgMCUNhbm9uaWNhbDES
MBAGA1UEBwwJQ2Fub25pY2FsMRIwEAYDVQQKDAlDYW5vbmljYWwxEjAQBgNVBAsM
CUNhbm9uaWNhbDESMBAGA1UEAwwJMTI3LjAuMC4xMIIBIjANBgkqhkiG9w0BAQEF
AAOCAQ8AMIIBCgKCAQEAxtnYiG1/DwZhXArZa1CRH0OJTOPjNvEl7wnOG2tM4jYW
7cs09tEM9tsKPb9ZbUo/AEFQZ+wUrTN6q/JDNPtDhzhAmOyhDnCsw8ZYEdceeAiF
NGEjpgHlMmDYEkgOXLjFVPeIGR/khyUAdD3+fZhZfRC/Jx+gJRWZ5Q1SXH5f3MBt
aou/+uwqJyCWOlcAzlKXxiEibxU8pDjVAnYCXFG7vUKsUEn5Tm8hEu9+rYTytPDR
QBc+X7jF/7SBRn9ko5lXPQjxCtHGnF5UszBei2+pHhTFe+XUvnyt+HmmhrTWOaay
THqBgYQDeTOe1+Xgm3962JI+MxQNKmsJWKAbxMYHJwIDAQABo4IBMzCCAS8wUgYD
VR0jBEswSYAUsK8NIt7X4GSIhLHqhrI7bHNDq1qhG6QZMBcxFTATBgNVBAMMDDEw
LjE1Mi4xODMuMYIUI2mlUN36rPr/i4E1RBrQL0eWHlowCQYDVR0TBAIwADALBgNV
HQ8EBAMCBLAwHQYDVR0lBBYwFAYIKwYBBQUHAwEGCCsGAQUFBwMCMIGhBgNVHREE
gZkwgZaCCmt1YmVybmV0ZXOCEmt1YmVybmV0ZXMuZGVmYXVsdIIWa3ViZXJuZXRl
cy5kZWZhdWx0LnN2Y4Iea3ViZXJuZXRlcy5kZWZhdWx0LnN2Yy5jbHVzdGVygiRr
dWJlcm5ldGVzLmRlZmF1bHQuc3ZjLmNsdXN0ZXIubG9jYWyHBH8AAAGHBAqYtwGH
BKwWFgOHBKwWFgkwDQYJKoZIhvcNAQELBQADggEBAK/JKu8U6k7IVwUlqH7jocPK
LVrCOpZHAkZaeuzQQhbtdDzgw4mN/2TkoM2ZYYqDqmqZbw4+916lYawc3myl2bJg
3JSF//9d5GEFIFfRW/XO2A8jNHrJzP8trdoQmhV12ZFuo1ZNL6VFdSIXsRI1MKZK
fBJXsHpiux4L7LLAD3BRV5KLeTmQB3Y9jsZQTEULZuGjZSNx0OCkamFaEpuPfVCB
k0QEyze5ej4NUdpQITG0mraoRWtCRmYjdvd8KohU40mVUzXYC0DU+/7W65WhRs9d
Bz87K8KFb79oquNDIa9k5wHO5JbEQn7EESXRNqYTiNw4c8cj7sCPmjev3VtrJKE=
-----END CERTIFICATE-----
---
Server certificate
subject=C = GB, ST = Canonical, L = Canonical, O = Canonical, OU = Canonical, CN = 127.0.0.1
issuer=CN = 10.152.183.1
---
No client certificate CA names sent
Peer signing digest: SHA256
Peer signature type: RSA-PSS
Server Temp Key: X25519, 253 bits
---
SSL handshake has read 1643 bytes and written 357 bytes
Verification error: unable to verify the first certificate
---
New, TLSv1.3, Cipher is TLS_AES_128_GCM_SHA256
Server public key is 2048 bit
Secure Renegotiation IS NOT supported
Compression: NONE
Expansion: NONE
No ALPN negotiated
Early data was not sent
Verify return code: 21 (unable to verify the first certificate)
---
---
Post-Handshake New Session Ticket arrived:
SSL-Session:
    Protocol  : TLSv1.3
    Cipher    : TLS_AES_128_GCM_SHA256
    Session-ID: 6780E06932E9D602377EDF94473D634CD31CB696A14D574EB02DC1164FFC2F9B
    Session-ID-ctx:
    Resumption PSK: 89EAAB941D259774B607F4D052DC97398B79F7A13031DDE0F9957D7236B06EC2
    PSK identity: None
    PSK identity hint: None
    SRP username: None
    TLS session ticket lifetime hint: 7200 (seconds)
    TLS session ticket:
    0000 - d8 ed 60 d4 49 55 4e dd-bb b9 51 cc 0d db 07 f7   ..`.IUN...Q.....
    0010 - 8f 97 6b a9 5e f7 20 98-ef 72 fe 81 a0 b7 b5 bd   ..k.^. ..r......

    Start Time: 1717936662
    Timeout   : 7200 (sec)
    Verify return code: 21 (unable to verify the first certificate)
    Extended master secret: no
    Max Early Data: 0
---
read R BLOCK
---
Post-Handshake New Session Ticket arrived:
SSL-Session:
    Protocol  : TLSv1.3
    Cipher    : TLS_AES_128_GCM_SHA256
    Session-ID: 811ADECB78A5EB2DF5756332AA53F16BBFB13CFD1FC3B00F179D5ACDFD4AC37B
    Session-ID-ctx:
    Resumption PSK: B8C84C5F67427E7BAFE406CE1F9609C8446D676E51E42727BBF7A040046643F8
    PSK identity: None
    PSK identity hint: None
    SRP username: None
    TLS session ticket lifetime hint: 7200 (seconds)
    TLS session ticket:
    0000 - 63 08 19 5c d9 63 46 06-ed 79 02 e2 9d f5 69 3d   c..\.cF..y....i=
    0010 - 93 23 99 41 26 93 5f 6d-ae c6 c4 c5 35 92 40 34   .#.A&._m....5.@4

    Start Time: 1717936662
    Timeout   : 7200 (sec)
    Verify return code: 21 (unable to verify the first certificate)
    Extended master secret: no
    Max Early Data: 0
---
read R BLOCK
closed
That looks pretty good, too.
The Verify return code: 21 (unable to verify the first certificate) is a little nervy. It IS still a self-signed cert, so it wouldn’t be able to match it against the OS CA certificates. I reckon that makes sense.
Does kubectl like it?
We’ve got this far, we may as well go all the way:
$ kubectl get namespaces
NAME                STATUS   AGE
kube-system         Active   2y292d
kube-public         Active   2y292d
kube-node-lease     Active   2y292d
default             Active   2y292d
You beauty! That looks like a winner to me.
Why?
Well, my cluster isn’t that stable. I’m constantly tinkering with it and it falls over pretty regularly, for one reason or another. I spend a reasonable amount of time picking the nodes back up and putting them back in the cluster again. It’s mostly replicated shared storage (OpenEBS Jiva) that’s the culprit here, but that’s a story for another day.
Because I’m running on VM’s in a very limited home lab, I have no room to scale, so I can’t just run up another node to replace a faulty node. I need to get the faulty one working again. This is normally as simple as rebooting it. But that’s actually not that simple. It’s not difficult either, it’s just a process. Thankfully I can automate that with Ansible.
While that node is rebooting, the Control Plane API endpoint is also not available for at least one third of the time (during these reboots). This also means I can’t manage, monitor, or otherwise maintain my cluster while my ~/.kube/config is pointing at that host.
To get around having to edit my ~/.kube/config everytime, I thought I’d load balance the Control Plane API on my pfSense firewall. I figured if the pfSense isn’t available, I’ve got bigger problems. Also, if I really needed to, I could always edit my ~/.kube/config and point it directly at a node in the cluster again.
Other ideas I probably should have thought of
DNS round-robin
Using any of the existing SAN hostnames, I could have created an internal DNS entry for that name and pointed it to all of my node IP addresses.
While not great, it would probably still work. The odd error would still come through if kubectl tried to connect to a node that was down at the time.
Maybe kubectl is smart enough to retry these? Maybe not? I don’t know. I didn’t try it.
Other things I tried that didn’t work
tcp load balancer with SSL Offloading (SSL pass-thru)
This is how I know about IP Address SAN’s (Subject Alternate Names).
Because it verifies the IP SAN and the Load Balancer IP isn’t on the list, it’s invalid.
Yeah, that doesn’t work.
Setting the client certificates
Either in the HAProxy Frontend config, in the “SSL Offloading - client certificates”.
Or in the HAProxy Backend config, in the Server Pool - Server List - Client Certificate” entries for each individual backend server.
Yeah, that doesn’t work.
Commenting out the certificate-authority-data entry in your kubectl config
I saw some comments saying you could comment out the certificate-authority-data section in your cluster’s config in ~/.kube/config and it would ignore the certs.
This bit:
- cluster:
    # certificate-authority-data: <secret cert and key business>
    server: https://172.22.22.3:16443
  name: pvek8s-cluster
Yeah, that doesn’t work.
Lots of HAProxy config trial and error
- Don’t configure client certificate details
- Differences between
http/https (Offloading)andssl / https (TCP mode)
Yeah, that doesn’t work.
Explore other related articles:
Penned by Paul Macdonnell on 2024-06-09
Things do, stuffs get